I never set foot in a canoe or slipped myself into a kayak until maybe 12 years ago. The opportunity just didn’t present itself. Growing up elsewhere, there were always other boats available, and given a choice, you know where I stand with sailing. Paddling up or floating down fresh water had never gotten past the inner tube. However, with canoes and kayaks, access to the water, specifically the James River, has opened up. After living in the Richmond area for now decades, I wonder why I was so late to the party. I have some catching up to do.
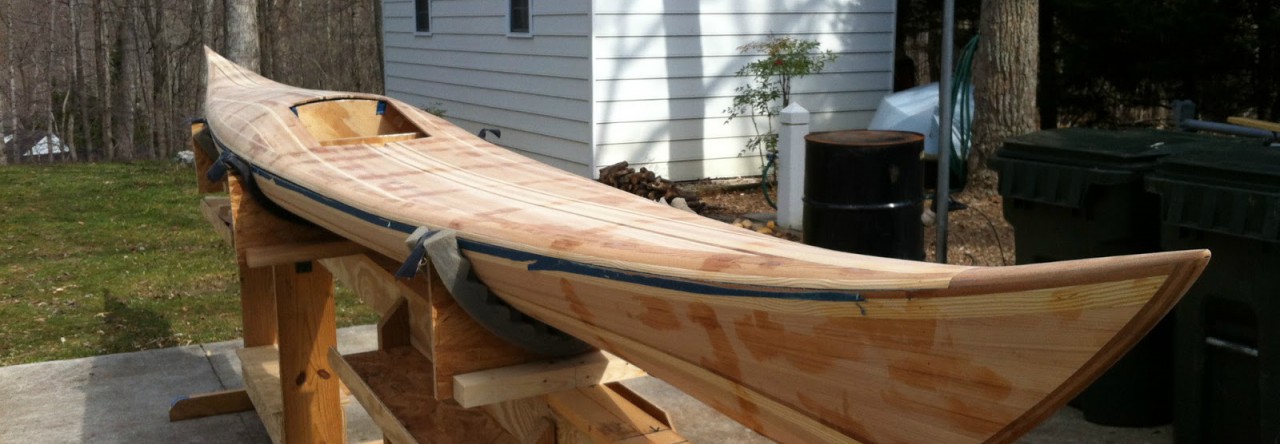
My middle son and I built two fuselage framed “skin on frame” (SOF) kayaks and have done numerous day and overnight trips with them. My cedar stripped Outer-Island was the next progression toward bigger and more skilled boat building. She is an entirely different animal, slick, fast with none of the wasted energy absorbed in the previous SOF’s. One drawback to the O-I is she’s not tolerant to raking across occasional rocks. The SOF’s seem to escape damage. No surprise there.
At the Mid Atlantic Small Craft Festival last weekend, a friend allowed me to paddle a kayak I have been eyeing for several years now. It is the Cape Falcon F1. First captured by the beauty of this design in traditional SOF construction, paddling the boat locked actually building one. After reviewing all I could find on the F1, I took the plunge.
After reading the designer Brian Schulz cautions getting the lines just right, I decided, unlike his “eyeball” method to use molds assuring some accuracy. Documentation is largely photographs below. Days are not necessarily consecutive.
F1 Specifications:
- Length: 14′ 13/4″
- Beam: 23″
- Depth to shear: 81/2″
- Depth overall: 11 11/16″
- Projected Weight: 29 lbs.
DAY 1: (8 hrs)
- drafted design lines into AutoCAD.
- surfaced 3/4″ Western Red Cedar boards, (2) 1×8 x 16′.
- cut out gunnels, stringers and keel from same.
- lofted and cut molds.
- made deck frame lamination jigs and laminated 2 of 3 beams ( 0.1875″ cedar strips) after soaking.
DAY 2: (6 hrs)
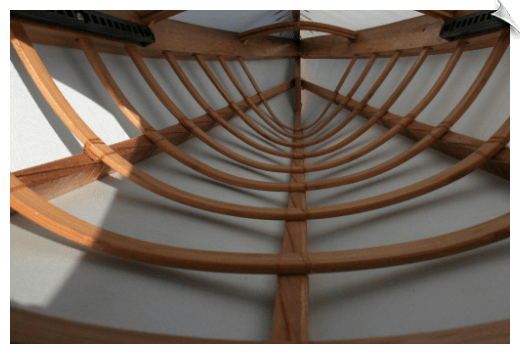
- cut gunnels to length, marked beam locations and drilled mortices for ribs.
- set up strong back and mounted molds.
- began to set gunnels and shape their ends.
DAY 3: (5.5 hrs)
- planed aft gunnels to fit flush. Tied together.
- added aft stem board. May use for drain plug.
- spent 1 hr finding owner of wayward dog “Riah”.
- cut aft deck beams, laminated and mortised into gunnels.
- cut fore and aft stems. Struggled with aft one, but don’t like how it sits. Will review next session.
DAY 4: (7 hrs)
- trimmed and lashed stems onto gunnels and keel.
- planed edges of keel and chines. Sanded same.
- cut and fitted above. Lashed all onto stems.
- cut forward deck ridge. Fitted forward stem to receive ridge.
- took measurements along gunnel to chine to confirm designed dimensions. All is OK.
DAY 5: (7 hrs)
- sanded, trimmed and mortised fore deck beams. Pinned beams with cross dowels.
- mounted and lashed fore deck ridge beam.
- installed aft deck stringers in oak.
- stepped back to observe lines. Noticed aft stem was not right. Too much rocker. Measured to find keel was 2″ off. That explains tight bend in keel. Thought I had measure correctly. Think I misread my 1:1 scale print of stem.Cut off old stem, made new one and lashed in. Boat is right now.
- Sanded overall.
- now only the two 1/2″ x 1/2″ knuckles remain before installing ribs. Brian prefers using laminated bamboo with vertical grain, but I can’t locate the sheets economically. Will use oak.
We’re at 33.5 hrs so far. Surprised it has taken that long. Been fun. This is as close to an instant boat as you can get.
The weather has finally changed for the better. Going sailing.

Hello,
Came across your blog while searching for information on the f1.
Did you use Brian Schulz’s videos to build your f1 ?
$225 for the video is quite steep and adds significantly to the total cost.
Gerhard
The videos were not available when I built the F-1. A friend has taken the video class and built 2 boats. He says it was worth it. From what I can glean, I’d have to agree.
Hi,
you used an interesting method to fix the keel while building it which I find very good to ensure it doesn’t twist – how did you modeled these templates, based on your CAD, or…? Any chance to share them?
Thanks!
D.
Thanks Davor. Yes, used cadd to trace the free plans Shultz gave at the time. While I’d like to help, it’s not my design to share. Cape Falcon is very reasonable in their prices and offer educational video classes. Wonderful design. Good luck-