
DAY 13: (4 hrs)
- Began covering. I used these 2 videos to help:
- Yanking the cover back over the aft stem was a bear. I used the 2.5″ cloth length recommended in the CF video. This worked once I planed off the coating from the aft stem. The coating caused the cloth to stick.
- Tightened the after deck with tarred twine and then sewed welting into center with nylon string. Note: the staggered stitching as demo’d in the SK video makes a big difference in appearance. I actually sewed this twice as some puckers remained.
DAY 14: (4 hrs)
- Sewed front deck up and set the cockpit ring on.
- The ballistic nylon is quite tight. Some heat shrinking with an iron on “nylon” cinched the last bit of wrinkles out.
DAYS 15-16 and eventually 18: (11 hrs)
- Hooped the bottom (3 coats) and a week later, the deck (also 3 coats). Chasing the runs down was not too successful. Using a kerosene heater raised the temp to 65 degrees, but maybe warmer would have helped. Otherwise, I followed Spiritline’s coating videos to a tee. Somewhat dissappointed, I called to report the results. The owner tells me they no longer use the video’s method or the scraper included with the urethane! Instead they use “hot dog” rollers. Thanks for nothing! Nonetheless the boat stil passes the 6′ rule. I’d love to hang her with lighting in the house when not used. She’s a Japanese lantern of sorts.
- I added a teaspoon of rare earth pigment to temper the harsher urethane. UV also tends to yellow the coating, but I wanted to accelerate the appearance. I’m happy with the result there.
- Screwed a 12″ length of teak on the tail for a skid.
- Bought some latigo leather belt material and cut it into 1/4″ strips for tie-downs and stem handles. Pulling the strips through a 7/32″ hole in a block of wood eases the edges. Will add tie-downs in middle of boat later. Had to get this one in the water.
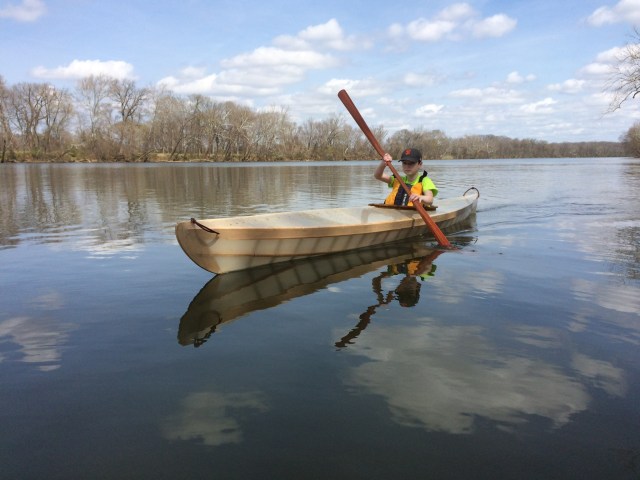
This final post took forever. The cold weather hadn’t encouraged completion. However, my youngest boy and I splashed the boat today. Will post video later. This may be my favorite kayak yet. The translucent shell and visible ribs accent the beautiful lines. Despite all the runs and drips, this little kayak has the wonderful look of craftsmanship, the touch of the hand. I love it. A nice light rowboat build could easily use this construction. Hmmm.
Total build hours: 85+/- hrs.
Final all up weight: 28 lbs 4 oz.

Pingback: Building an F1, Hour by Hour – Lingering Lunacy